Like just about everyone, we’ve been cooped up around the house for quite a bit because of the pandemic. The one upside is that it’s given me some time I probably wouldn’t have gotten otherwise to get back up and running with woodworking. I thought I would share a few of my recent projects since nobody can come around to see them in person.
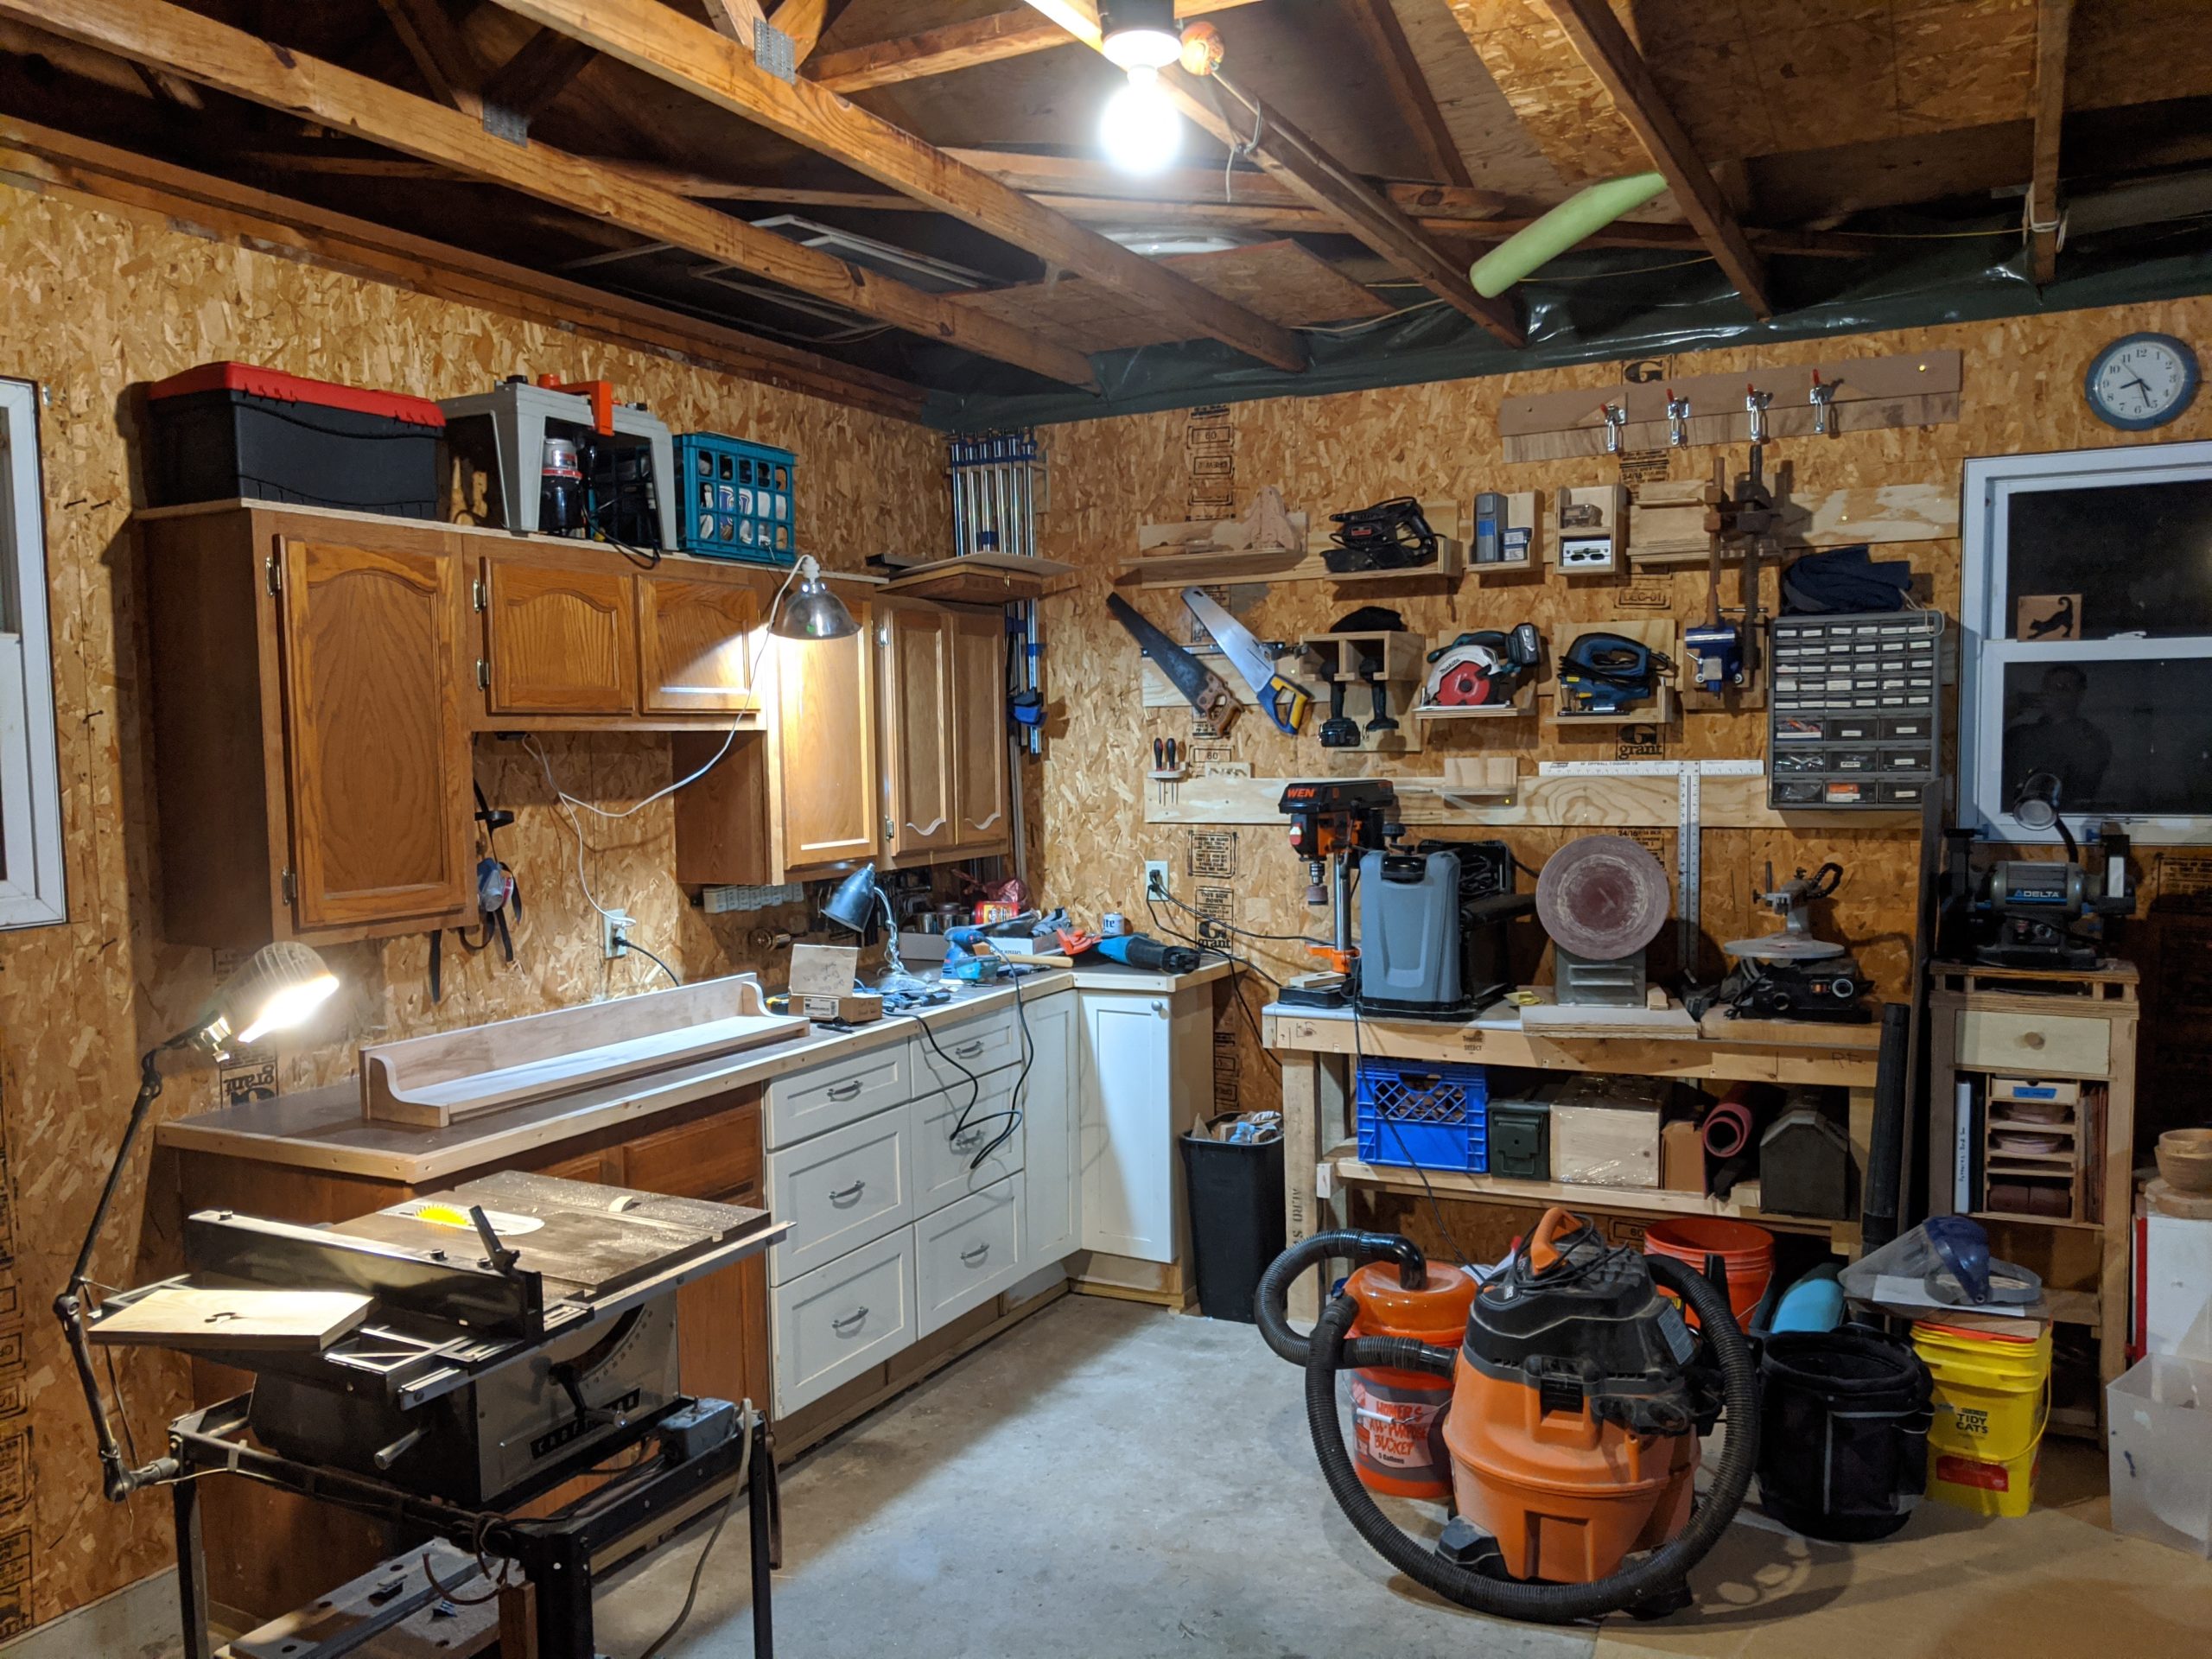
We moved into a new house at the beginning of the year and my woodworking shop is getting moved from a basement to the garage. It took a while to get set up, but my tool wall did speed things up quite a bit as I hoped. I’ve got quite a bit more storage too. The garage had one set of lower cabinets and some upper cabinets that I am keeping. A friend of mine was also getting rid of some cabinets with drawers and a corner cabinet with a Lazy Susan that I snagged. I put it all together on some pressure treated 2×4’s that I cut and shimmed so the whole thing was level since the garage floor slopes. I made a top out of two sheets of 3/4″ OSB, topped that with the backside of some 1/4″ paneling that was left, and ripped some 2×4’s to use as edging. All in all, it turned out pretty great!
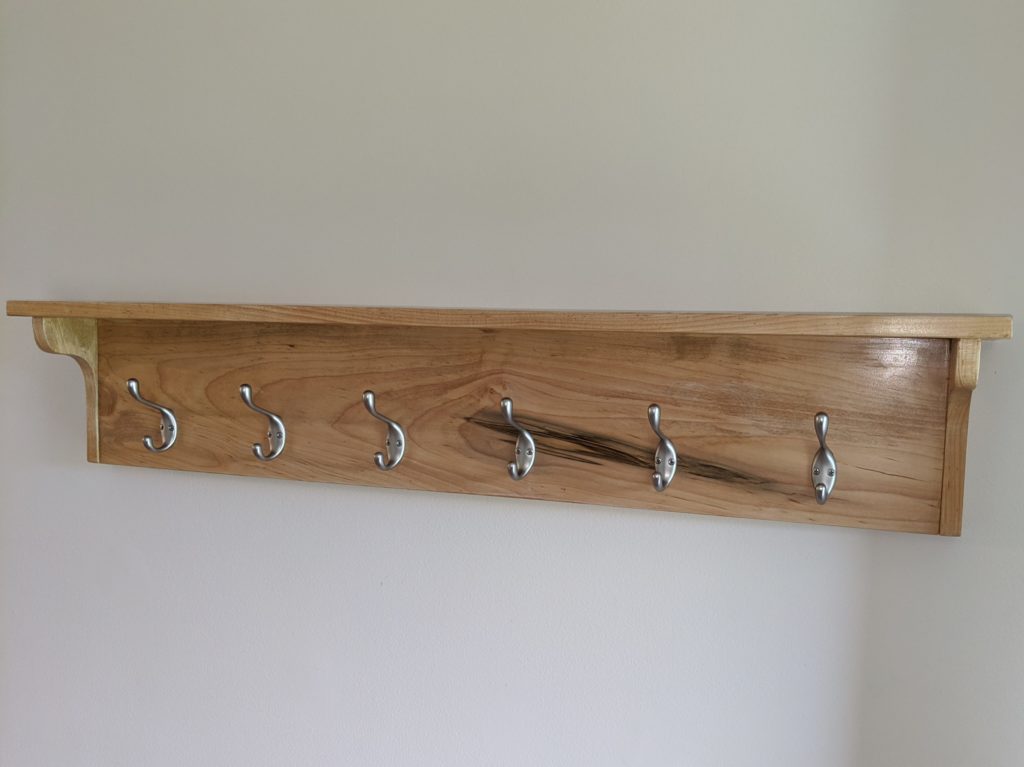
To break in the new space I made a coat hook with a shelf for the new entryway.
A few weeks ago I got an unexpected surprise – a snow week! Maybe the best thing about working at a university is snow days as an adult, and a whole week was something new. I used the time to organize the basement a bit.
When I first started making space to do some woodworking in our basement, I put up some OSB I had laying around from roofing our porch and mounted tools to it with random screws and nails.
First Tool Wall
It was a big step up from having everything laying around, but as I get more tools and understand what I use more often, I wished it was easier to move things around.
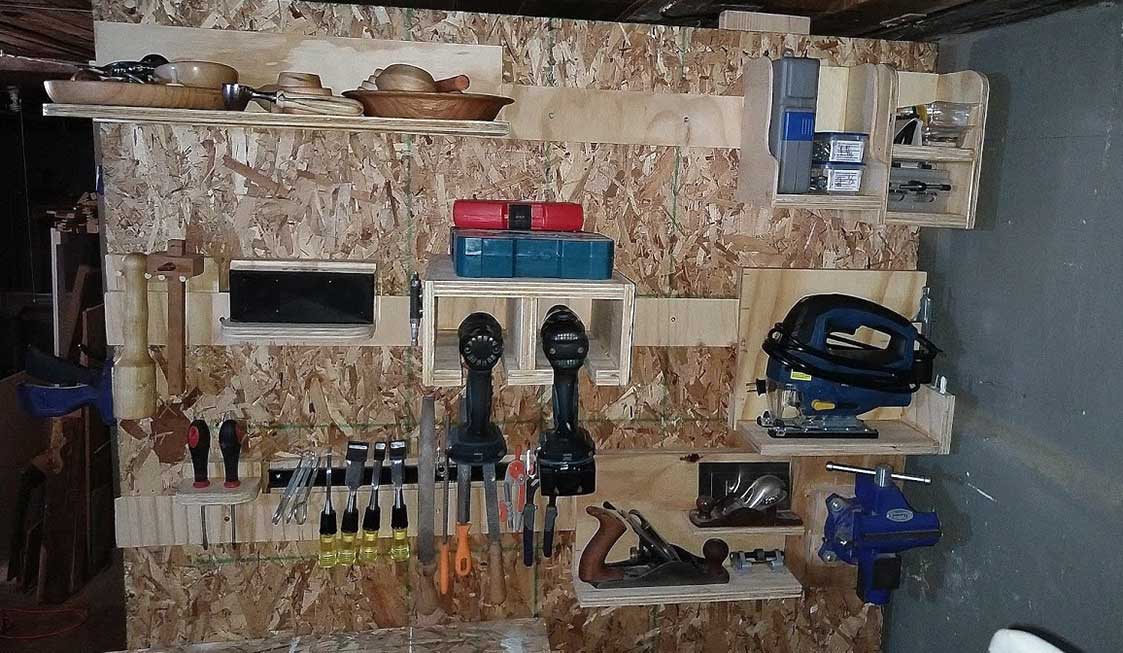
In the other corner, I had an old wire rack that I was using to store some of my other tools. It was messy, and really hard to keep organized since it was basically just semi-organized piles. Behind it was the end of some storage shelves that I built a while ago. The ends were two 2×6’s so I decided to put up a storage wall there as well but wanted to try using french cleats.
What’s a “french cleat”? It’s a really simple but strong way to mount things the involves cutting strips of wood at an angle and mounting one to a wall and one to something you want to hold, like this:
The genius of this is it is really strong if you build the tool holder correctly (more on that later), but it’s still easy to rearrange if like me, you are adding to your tools as you go. There are lots of good videos about making them on youtube, I checked out a couple for ideas before I started.
Much Better!
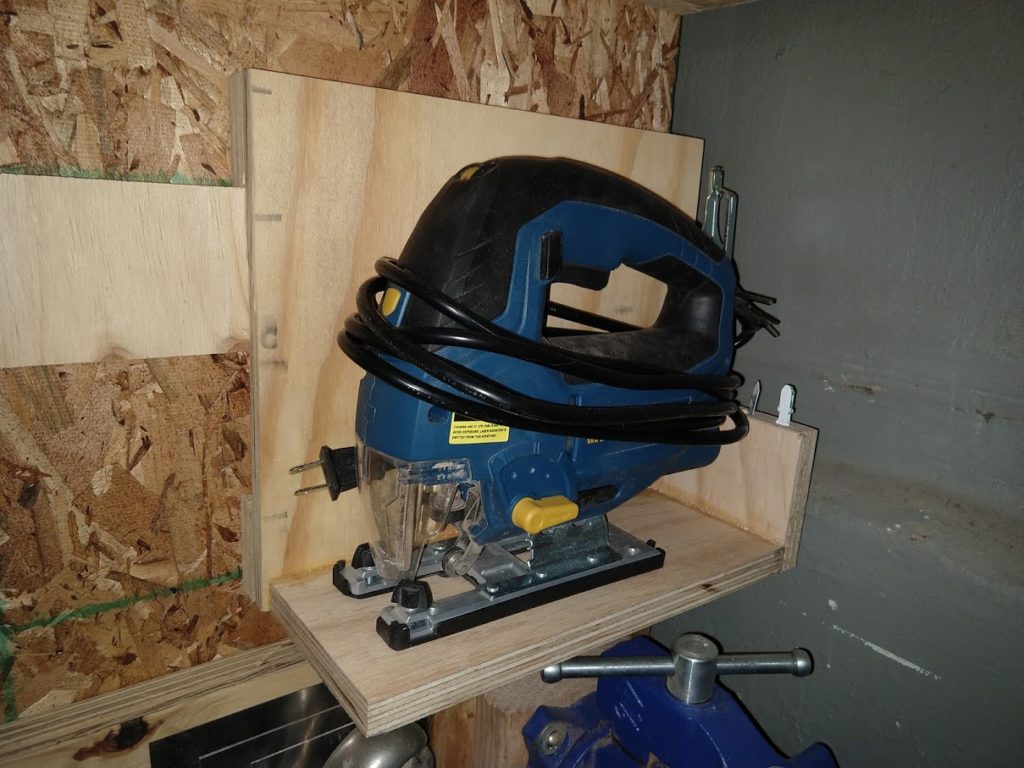
The one thing I learned (a little too late) is that you have to be careful about providing enough vertical support under the cleat on the tool holder that the weight doesn’t pull it forward. This is easy to do by just putting a 3/4″ strip at the bottom of anything that is a little taller. The only holder that I might have an issue with is the drill holder. It wasn’t tall enough to add any support underneath, and I knocked it out once by bumping it when building the holders. I think it will be okay, but for the others, like the jigsaw, I added a strip to the bottom and it is rock solid.
All in all a fun and productive way to spend some unexpected free time. I also got a mobile tool base kit from Harbor Freight for my table saw and built that with some leftover pallet wood I had laying around. Moving the saw is about 100 times easier now, I didn’t realize what a pain it was before. I repurposed the wire rack to organize some of my wood, although I think a rolling lumber cart might be my next bigger project.
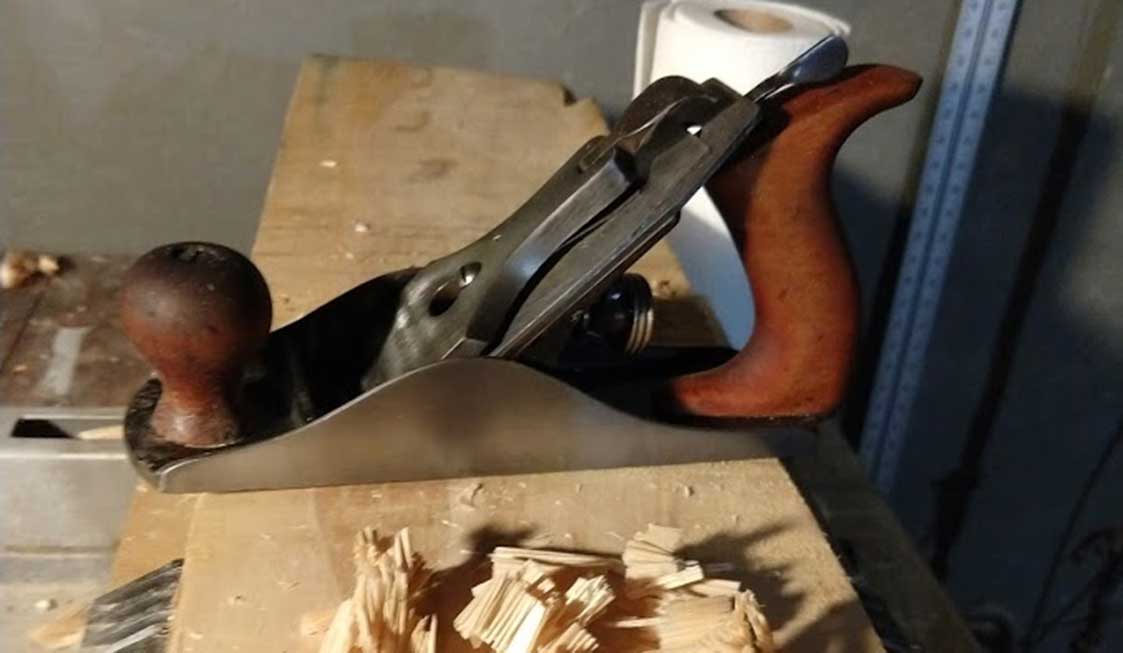
A few months ago I picked up a hand plane at an antique shop we had stopped at on our vacation. I had been keeping an eye out for one since I was looking to get into woodworking a little more. Supposedly, old planes are just as good as new ones once they get restored, and the restoration process seemed simple enough. Long story short, it went really well, and I get why people are obsessed with these things.
The coolest part, is I posted online asking if anyone could identify it. Since it didn’t have any branding on it I couldn’t tell and was curious how old it was. Thankfully, the internet can be a neat place and someone was able to tell me they were pretty sure it was most likely make somewhere between 1902-07. Crazy right?
Maybe it’s because most of the things I make day to day are websites the get stale after a year or two and become useless after about five, but it’s really interesting to think that I am using something someone made over 100 years ago.
It took a lot longer than I wanted, and it is really far from perfect, but it is pretty satisfying to see it all done. I’ve made some shelving and stuff before but this is the first thing I have made that wasn’t destined for a basement or garage. My plan to finish a small woodworking project each week took a bit of a hit, but hey, nobody’s perfect. On top of that, my son came 5 weeks early, so it wasn’t quite on time. I’ve been learning a lot about woodworking online lately, and really enjoy when people post their thoughts on a project, so I thought I would do the same.
Making Plans
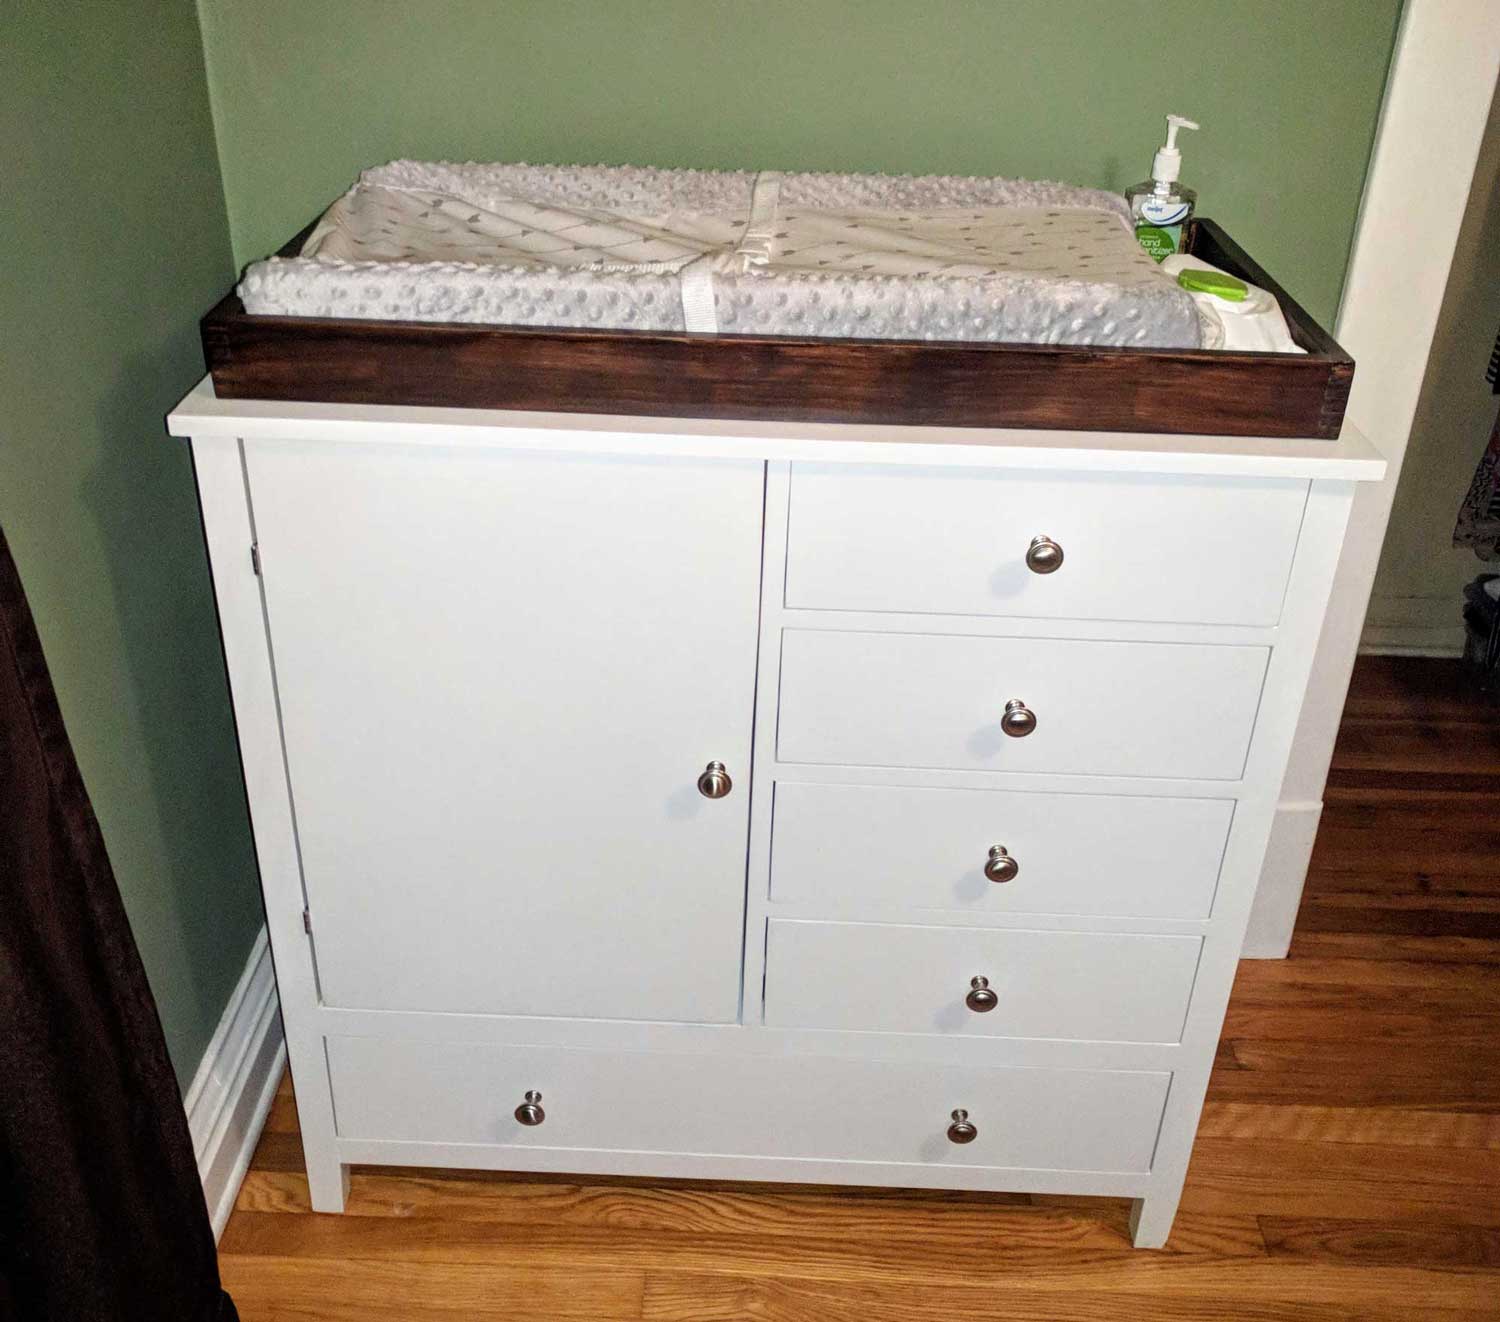
I had a lot of trouble finding plans that I liked for this. Originally, I had wanted to make a simpler version of a changing table that I had found online here. My wife wasn’t a fan of the open design because she thought it would look messy when it was full. I then looked around at plans online and decided to make a split dresser with drawers on one half and a section for hanging clothes on the other. I’m glad she said something because this is a lot more practical for us, especially since what we really needed was storage for clothes.
I found a few designs, but none that worked exactly, I decided to roughly follow this design, but substitute dowels to hold the panels together and box joints for the drawers. I also made the changing pad holder a separate piece and just attached it with mending plates in the back so that once we don’t need it anymore we can take it off and just use it as a dresser.
The Build
All in all, it went fairly well, but took a lot more time than I was anticipating, and cost a bit more as well. It’s all made of pine, the larger panels are all pine plywood. It hurt to have to buy the nicer “select” grade pine but I think it was the right call in the end. I ended up making the top from a piece of edge-banded 3/4″ plywood I had left over from the sides to save some money, as I was planning on putting a changing pad holder on top of it anyways. The doweling jig I bought was pretty easy to use and I will definitely make some more things using it. The pocket screws were quick and easy, I borrowed a jig for this project, and it’s definitely on my list of things to get now.
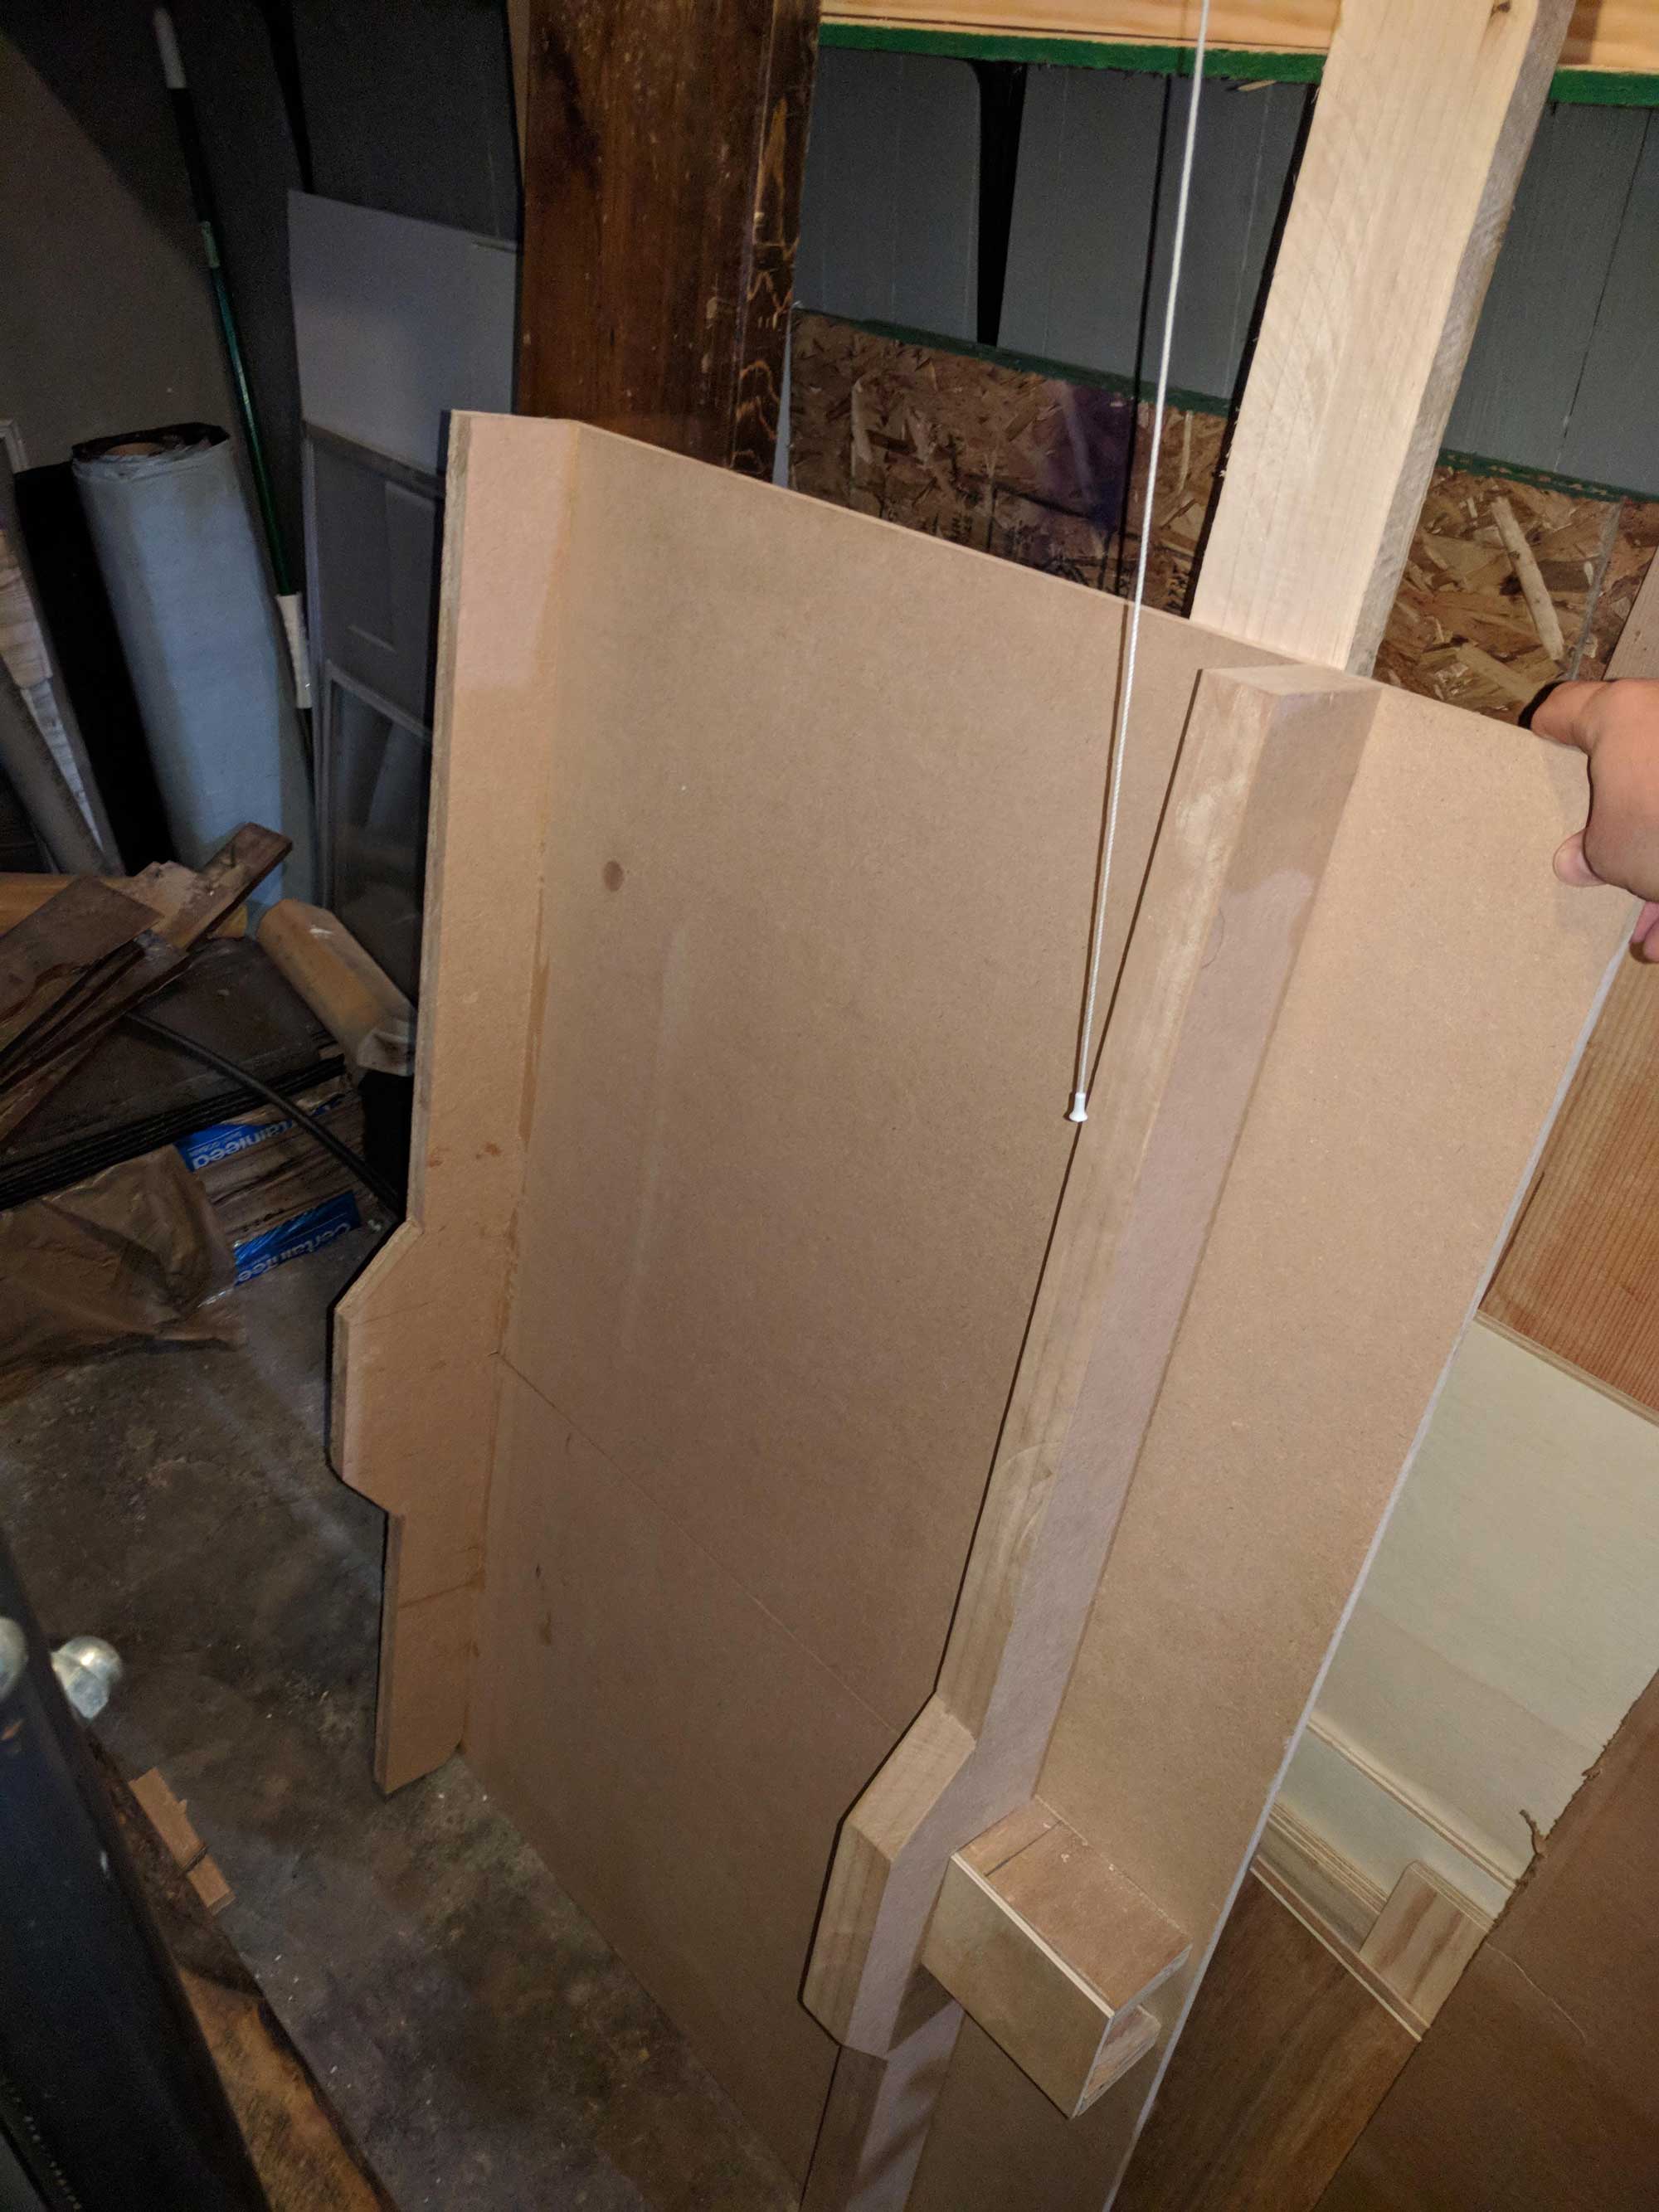
I tried making a cross-cut sled before I started to help get accurate cuts. I didn’t do a ton of research and it turns out I made all the mistakes I would read not to make later. It was huge, way too big to use easily, and I made the runners too short, so when I got all the way to the end of a cut it started losing its accuracy and wiggling. As a result, I spent a few nights and a Saturday making something that I promptly set in the corner in anger and haven’t moved since.
Failed attempt at a cross-cut sled
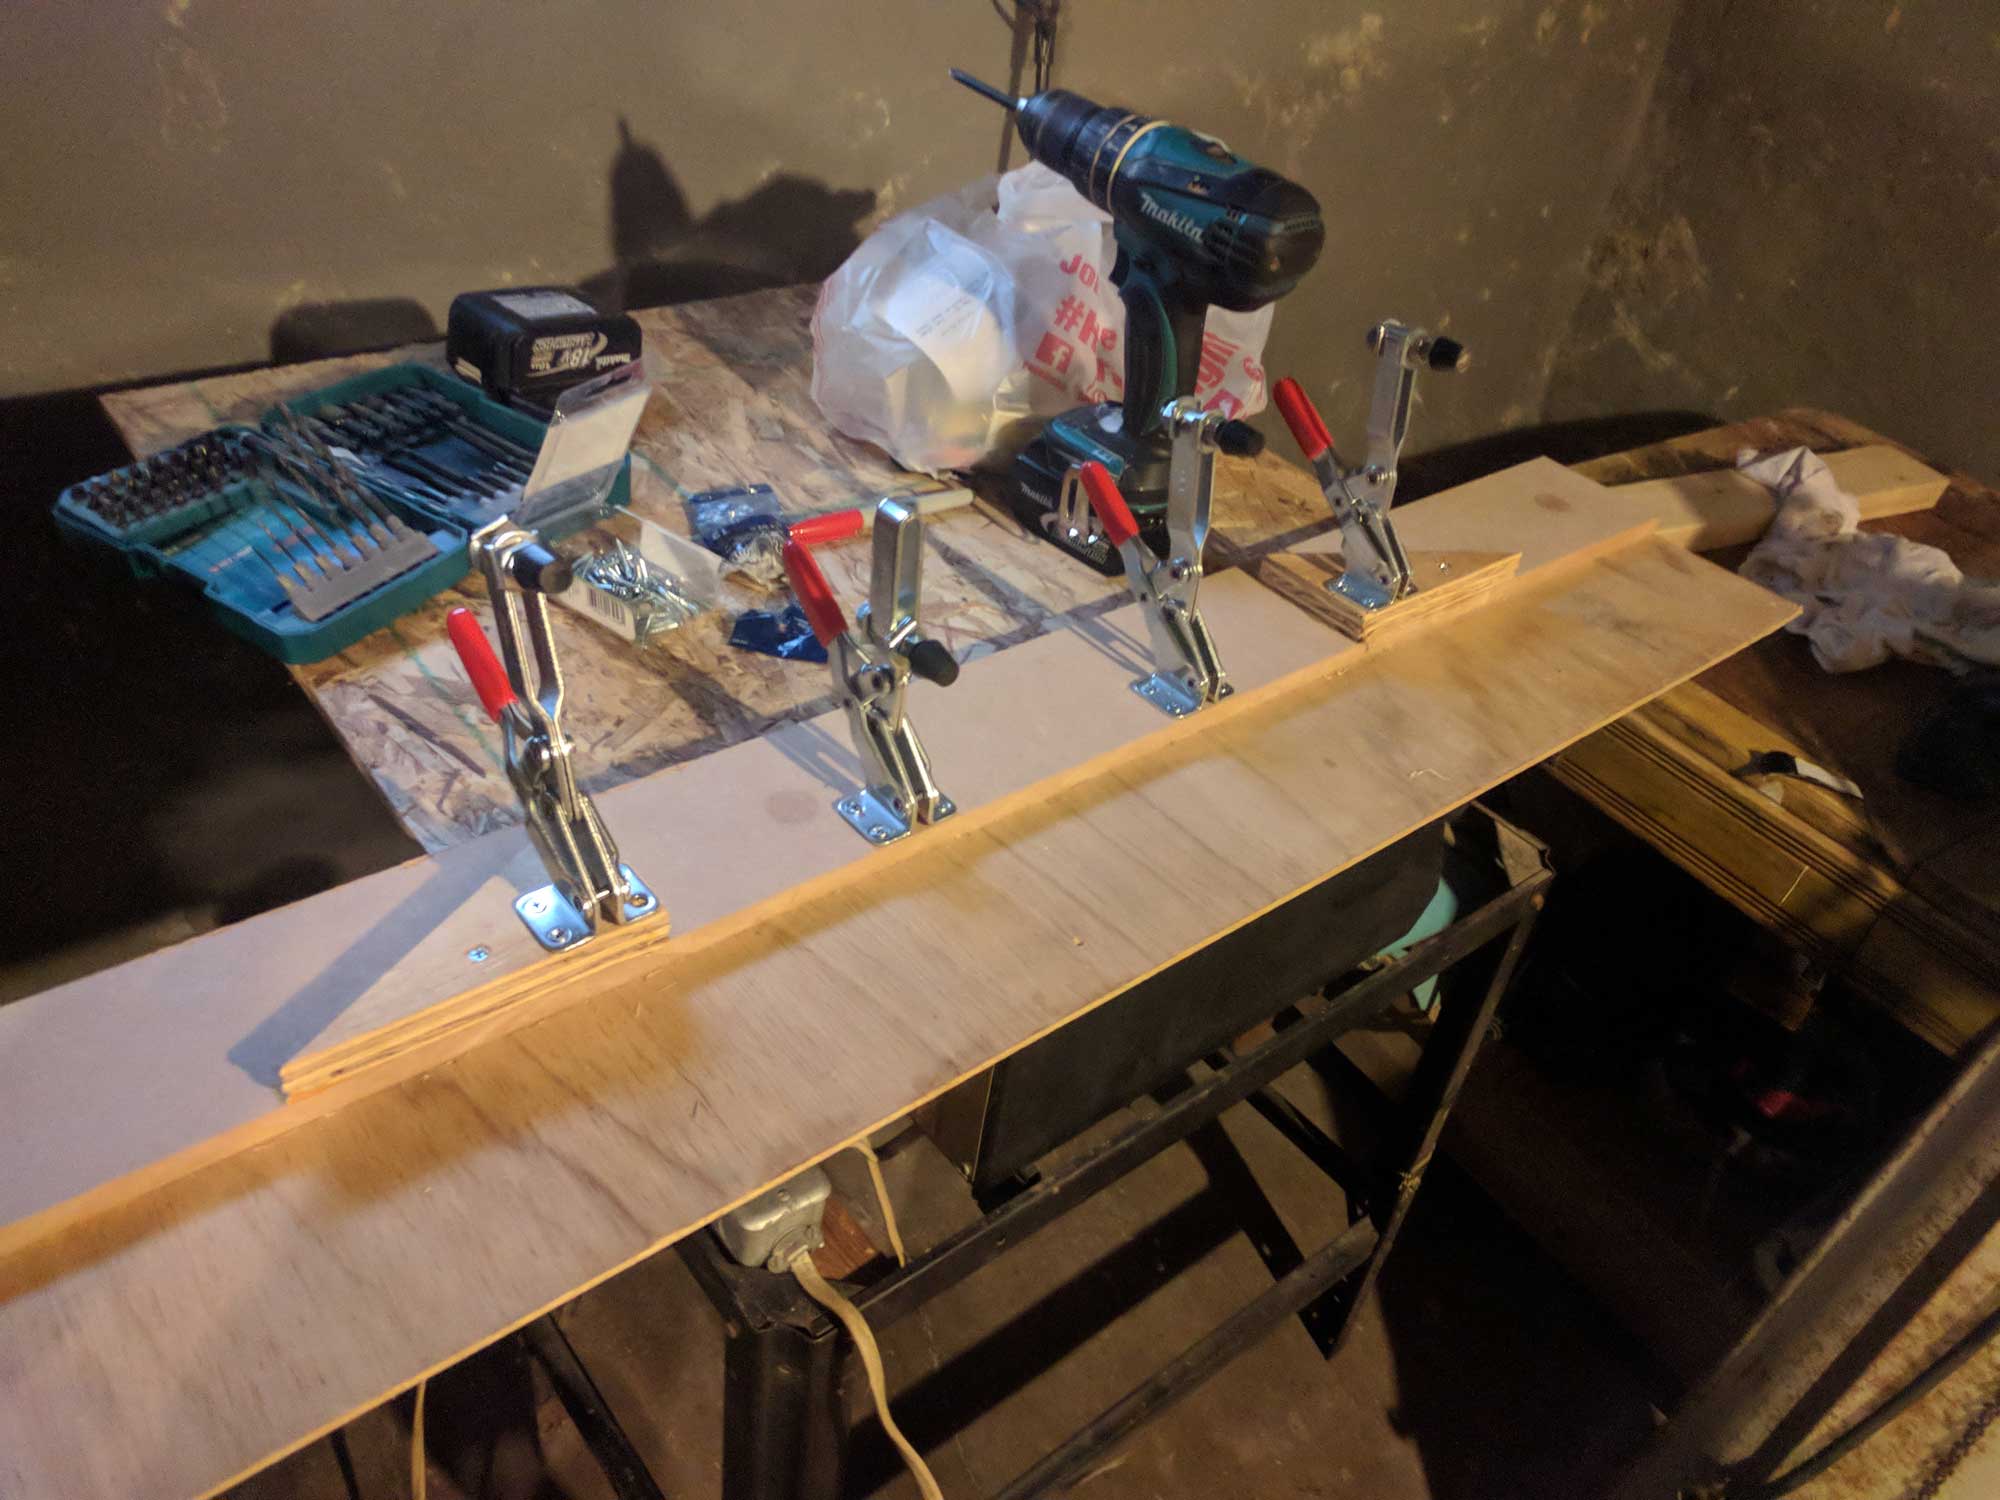
Tapering Jig for the legs
I also made a tapering jig to taper the legs and that worked pretty well. I needed a jointer jig as well, so I kind of cheated and went for a two in one. The clamps on the risers were for the 2×2’s that I tapered, the ones without can hold 1/2″-1″ boards to prep them for jointing. Got the clamps at Harbor Freight so it was pretty inexpensive. To use it to taper, I just eyeball how much I want to taper, clamp a stop block on the end and a scrap piece in the middle that pushes the far end out how far I need. It’s not high tech or probably the best way to do it, but it worked great for me.
Speaking of tapered legs, if you look close, the taper on the front right leg is going the wrong way, I wasn’t paying attention when I drilled the dowel holes and I didn’t have any more 2×2 stock so I left it. Oh well, adds character right?
Finishing took a lot of time. I painted the dresser itself with semi-gloss white paint we had left over from the trim in our house and top coated it with spray on polycrylic. I decided on polycrylic as a top coat because I assume this thing will be getting peed on a lot. I finished the drawers with spray lacquer. I went with lacquer because it dries so fast, I was able to knock out all of the drawers in an afternoon. The top I finished with a stain and polyurethane in one. I went with the two in one to save time, since the child it was for was already 8 weeks old at that point. It doesn’t look great, but since it is mostly covered anyways I just put the best side forward and called it good. I had wanted to turn my own drawer pulls, but with the timeline so far behind, I just bought some. My wife picked them out, she has a better eye for it than I do and I really liked them.
After Thoughts
If you are starting out, don’t go for inset drawers, they are a real pain to get right.
If you are only using one pocket screw to attach something, you need to really clamp it in place to keep it from swiveling, I had all kinds of issues with the small 1×2’s in between the drawers, I ended up putting a clamp on the side piece right above and below them and that worked out okay.
When you attach the drawer slides to the drawer, make sure you leave some room so you can adjust them. I butted them all the way to the front at first, then when I was working on flushing them tot he cabinet, if the drawer was too far out I had to take the whole thing off and move it back.
Finishing takes just as long if not longer than building.
If you asked me anytime in the last three to five weeks, I probably would have told you I will never do anything like it again. Now that it’s done, I can say I totally will, but I think I might stick to smaller things for a while.